This tutorial is designed to serve as a brief introduction to the Lucid matrix key. It is not exhaustive, but rather seeks to cover the basics necessary for anyone to quickly begin operating a key.
This tool offers a Javascript-based interactive key built using Lucid3 software. Lucid3 is software for creating and using interactive identification keys. Lucid is developed by Identic in Brisbane, Australia. Visit the Lucidcentral website for more information on Lucid and Lucid3.
Any modern web browser can be used, such as Internet Explorer, Firefox, Chrome, or Safari. Javascript must be enabled.
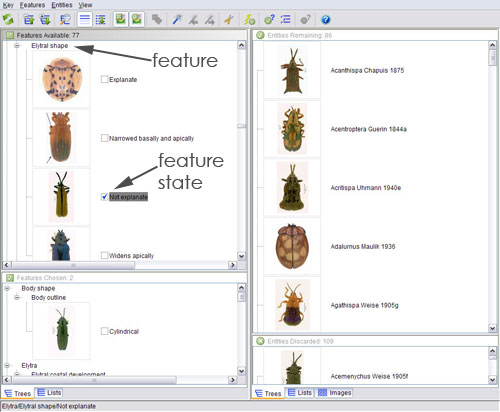
Getting oriented. In contrast to traditional dichotomous keys, a Lucid matrix key allows users to start with any character (called "features" in Lucid). The user interface is a window divided into four panels: (a) Features Available, (b) Entities Remaining, (c) Features Chosen, and (d) Entities Discarded. Whenever a feature (i.e., character state) is chosen from the Features Available panel, all entities not exhibiting the feature are automatically placed in the Entities Discarded panel, reducing the number of entities remaining. Theoretically, the more features are chosen, the shorter the list of available entities becomes. Clicking a chosen feature state will deselect it and return discarded entities back to the Entities Available panel. The function of the icons across the top of the key can be determined by hovering over the icon. You may have to hover for several seconds to see the name of the icon. You may also consult the help manual (the ? icon) for more information.
Each feature in the Features Available panel is listed above two or more of its states (also referred to as feature states). For example, "explanate" and "not explanate" are two states of the feature "elytral shape." Each state is shown alongside a state illustration or icon. State illustrations are indicated by icons or thumbnails, depending on the display option you choose.
Each taxon in Entities Remaining is linked to a representative image of that taxon. Taxon images are indicated by icons or thumbnails, depending on the display option you choose.
Clicking on an image thumbnail or icon opens an image window.
The first suggested choice in the key is to select your geographic region. This selection will rapidly narrow the number of genera under consideration. Some of the best taxonomic characters to determine hispine genera are on the antennae. This is usually the best place to start with an unknown specimen (it is unfortunate that the antennae are not retractable and are often broken off). The number, shape, relative size, and sculpture of antennomeres are often used in the key.
Other easily observed characters are found on the elytra. Of special use are the shape, sculpture, marginal sculpture, and number of puncture rows. The head also has some important characters - most easily observed is the presence or absence of the front horn. But characters more difficult to observe are also important.
In choosing a state, your specimen need not exactly match the state's illustration. Rather, choose the state to which your specimen looks the most similar, and/or pick the state that, by its wording, best describes your specimen.
Taxon images are only intended as representatives of each genus. Note that the images provided do not reflect all known variations within each genus.
Content last updated April 2014
idtools.org